I’d like to share how I photograph lightning and storms. People who see me out photographing lightning, as well as those who see the photos, always say the same thing, “you must have a very fast camera.”
I often laugh. Yes I have a fast camera. My camera’s highest shutter speed is 1/8000th of a second. But considering that lightning travels at approximately 3,700 miles per second, I seriously doubt my brain to finger response time is quite fast enough.
The truth is, it doesn’t take a fast shutter speed to photograph lightning, but rather a slow one.
But before I get into that, let me start by saying, lightning photography is VERY DANGEROUS and it’s important to keep yourself, as the photographer, safe at all times. Generally if you can hear the thunder you’re close enough to be struck. Lightning can strike as far as 10 miles from the cloud.
A general rule of thumb is if you are getting rained on, you’re too close. With that out of the way lets talk about how to photograph lightning.
Camera Gear
- A good sturdy tripod.
- A camera with adjustable shutter capabilities, preferably with a shutter speed 15 seconds or longer.
- If you’re using an slr camera you will need a wide angle lens for best results. For the lighting photos you see on this page I used a Nikon 18-105mm.
- A remote release is always useful. Remember for lightning photography you will be using a slow shutter speed.
Setting up and getting the shot
When i see a lightning storm I watch to see how often the strikes happen. If the strikes seem to happen every 30 seconds to a minute apart and if they are strikes from the sky to ground or from sky to sky, I find an open area where I can see for miles, or maybe a hill top over looking a clearing where I can see the storm coming. Well i say “see” but it should be in a dark area with little light.
That’s not to say a great lightning storm can’t be photographed in the day time, later afternoon, or early evening. It’s just easier to get good photos when it’s completely or close to completely dark.
After I find a good safe place to photograph from, I set my tripod and camera up pointing in the direction of the cloud with lightning, and if at all possible I try to get something interesting in the foreground.
Lightning Photography Camera Settings
Next, I count the time between the lightning strikes to get an idea of what shutter speed I should set the camera on. Generally I set the shutter on 15-30 seconds. I set the f-stop to about f/8 or greater if I need to cut the light even more to get the exposure correct on the strike.
When I have the camera set to where I want to start and I have an idea of how often the strikes occur, I press the shutter button and wait. Yes i wait. No speed needed. If any lightning strikes occur during the time my shutter is open and it’s in the field of view of my lens, I’ve captured that strike.
I then check my camera LCD screen to see if I need to adjust the f-stop darker or lighter. After the first strike is captured and if the lightning is striking any where from every few seconds up to 30 seconds apart, I continually press the shutter so that I’m taking a photo every 15-30 seconds with exposure times being 15-30 seconds long. If it’s a good electrical storm with a lot of strikes, I can capture 2-4 strikes in a single 30 second exposure frame.
How to get great colors seen in lightning photos
Dust, haze, moisture and raindrops can and will absorb light. It acts like a prism to the white light of the lightning, diffracting it into different colors. Depending on the light that passes through, it will determine a color seen by the eye.
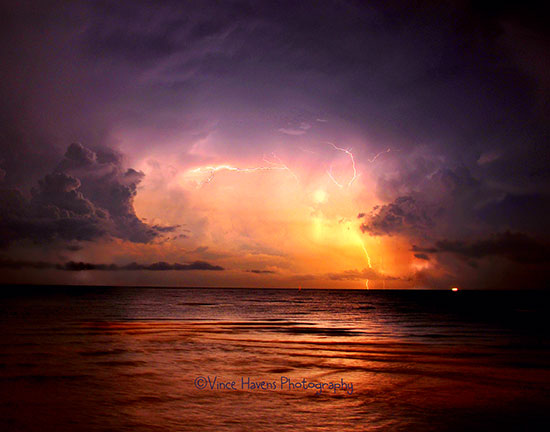
Most of the lighting I see is blue or purplish in color. However, by playing with the white balance of the camera, I can create the color of my choosing. I often set my camera’s white balance to florescent lighting, which while taking photos outside causes the color of the photo to have a blueish hue. When the camera is set on florescent white balance, the camera will internally use a blueish filter to try an correct the light to a good exposure. This results in a nice blueish lighting during exposure of lightning storms.

The great thing about taking lightning photos is that they are each like a finger print. No two lightning strikes are the same so every photo has its own unique result, though the strikes may look similar.
You can also shoot several photos of multiple strikes while never moving the camera, and then layer those images together in post processing to create even more stunning lightning photos. As with any photography, some artistic thinking makes great photos … greater.
Next you see a storm coming, get out there and photograph lightning using some of these tips from Vince and remember to stay safe.
If you have any further question on how to photograph lighting, feel free to ask Vince over on his facebook page.
About Vince Havens
 Vince is a freelance photographer who loves to photograph people, portraits, nature and wildlife. He’s had his work published recently in magazines and calendars. You can see more of his work over on his photo gallery at Vince Havens Photography.
Sign-up for our online photography course and learn how to master your digital camera in easy to understand “at your own pace” lessons.
Click here for more information and sign-up details!