I am quite often asked how I edit macro photographs? What editing or post production work do I make on my macro images?
Most of these types of questions come from those who use the same camera and macro lens as I own. Although the post production tips listed below will assist all macro photographers who edit their images with Photoshop.
It’s important to note, that no amount of post production work is going to improve a bad photograph. Personally, a good macro photo consists of 50% photo taking and 50% post production editing. However, as I said, you do need a sharply detailed image to start with.
How to edit macro photographs using Photoshop software
- The first tool I use to edit macro photographs is to crop them tightly. Not every viewer will look at the larger image (even when you supply a link), so it’s best to tightly crop the image so the details are clearly seen by a thumbnail. This also presumes the viewer prefers to see detail that isn’t normally seen by the naked eye. Which of course, is the true beauty of macro photography.Take the two images below for example, the first shows the original photograph (resized for display purposes), while the second photograph is a cropped version showing the finest detail.

Un-cropped macro photograph.
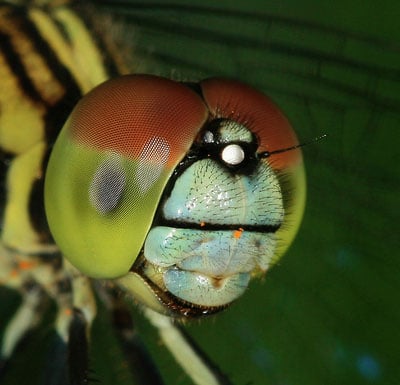
Post processing example of macro photograph.
- After cropping the macro photograph, I might resize the image, depending on how I am intending on using it. For example, if the plan is to display the image on a website, I’ll resize to no larger than 1024 width so it doesn’t take too long to download in the viewers browser. For printing purposes, I don’t normally resize.
- Next I sharpen the image by implementing a mixture of Photoshop’s Lab color mode and the unsharp mask. I won’t go through the steps here as we already have a tutorial for this called: How to sharpen images in Photoshop. This method not only sharpens, but in many cases also increases the color of the photograph.
- After sharpening, I’ll continue on to the Shadows and Highlights adjustment tool. Once again, we already have a Photoshop tutorial for this: How to use Photoshop adjustment tool? You will find this adjustment tool increases the detail seen within either (or both) the shadows and highlight area’s of your photograph.
- Lastly, I use Photoshop S curves to add or reduce contrast. The S curve tool allows you to highlight the parts that are important and darken those that are not. The S curve also seems to make the colors within the photograph appear brighter and bolder. You can find a tutorial on S curves at: How to use Photoshop S curves?
Learning a few post production techniques can help improve your macro images ten fold. The steps shown above will result in more colorful and sharper macro photographs, that contain more detail than you’d otherwise have seen in the original image.
When next you edit macro images that you have taken, try these steps above. Photoshop is a great tool to optimize your images and your viewers will love to see the fabulous detail you have captured with your macro setup.
Sign-up for our online photography course and learn how to master your digital camera in easy to understand “at your own pace” lessons.
Click here for more information and sign-up details!