Over the last couple of years, my partner and I have visited numerous zoos and taken hundreds of photographs of zoo animals. Although the photographs during these years were taken with different DSLR camera’s, including a Nikon D40, Canon 400D, Canon 5D and a Canon 5D Mark 11, the basic techniques for photographing zoo animals remained the same.
Zoo photography requires a DSLR photographer to think about numerous problems that may occur such as:
- Distance between the photographer and the animal.
- Cages and glass windows surrounding the enclosures.
- The movement of the animals.
- Tricky lighting. In most cases zoo’s don’t open until mid morning. By the time you stand in front of the first animal and set your camera up, the lighting can prove to be a challenge. Especially if the animal is in an enclosure that offers both light and shade.
- Other photographers and visitors. You don’t always have a whole area to yourself for setting up a tripod etc.
The answers to these problems lie in both the equipment a zoo photographer chooses to use on the day, as well as his or her technique.
What camera equipment will you need for zoo photography
In my experience, a long zoom lens is required to take good photographs at the zoo. By a long zoom lens, I am referring to one in the range of 100mm, to say 400mm focal length. In a lot of cases, you’ll find yourself shooting within the 200 – 300mm focal length.
My partner photographs with a Canon EF 70-300mm f/4-5.6 IS USM lens which is perfect for most situations, whether the animal is close in distance with 70mm being useful, or further away, with the 300mm range giving plenty of reach.
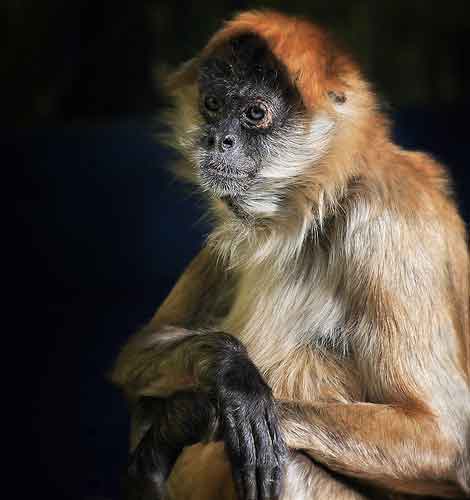
Monkey photographed with a Canon EOS 5D camera + Canon EF 70-300mm f/4-5.6 IS USM Lens.
A focal length of 300mm allowed me to get in nice and close for an ideal animal portrait, which was then cropped with Photoshop software, into a square for display purposes.
Camera Settings
Exposure: 0.004 sec (1/250)
Aperture: f/5.6
Focal Length: 300 mm
ISO Speed: 200
For comparison, the photograph of a giraffe below was taken with a focal length of 100mm to fit in both the animal and its surroundings.

Tripods or monopods?
Whether or not to use a tripod or monopod is often a grey area when it comes to zoo photography. Yes, it’s true that animals in darker enclosures may need a slower shutter speed to allow more light into the shot, therefore requiring extra stability. Personally in these cases, I prefer to increase the ISO to a higher number, for example 800.
Now those more experienced photographers would most likely argue that you could simply use a tripod instead of increasing the ISO. This is why I don’t use tripods for zoo photography.
I recently visited Sydney Taronga Zoo where a photographer was rather upset at an infant who grabbed the leg of his tripod to collect his balance. It doesn’t matter what type of expensive setup you have, photographers won’t look good getting angry at infants and children who may accidentally bump into their equipment.
This same photographer also expected other zoo visitors to give him ample room so he could take his professional photo. Need I say more?
If you own a DSLR camera the equivalent of a Canon 5D or Nikon D300, there is no reason why you couldn’t up your ISO to 1200 and still get a good quality image.
If you own an entry level DSLR and can’t reasonably increase your ISO, then I recommend using a monopod instead of a tripod. Monopods of course, taking up less floorspace, keeping other visitors in mind.
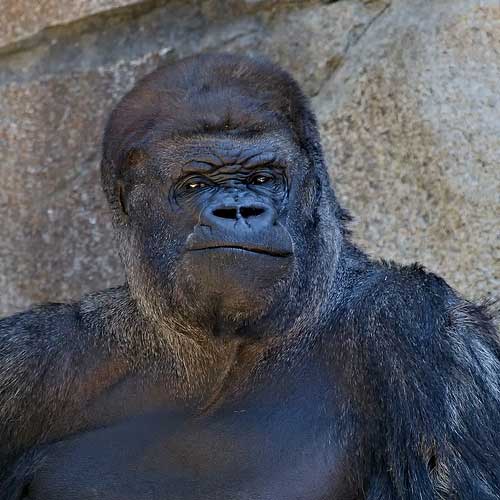
Silverback gorilla, photographed at Taronga Zoo in Sydney Australia, with a Canon 5D Mark 11 camera + Canon EF 100-400mm f/4.5-5.6 L IS USM Lens, no tripod.
Camera Settings
Exposure: 0.003 sec (1/320)
Aperture: f/6.3
Focal Length: 400 mm
ISO Speed: 1250
Lens Hoods
Lens hoods come in handy for times when you have no choice as to the angle from which to shoot. Often you may need to shoot into the sun. Lens hoods may be useful for stopping sun flares in these situations.
Zoo photography tips for beginners
Now for the technical side of zoo photography. Listed below are our top 10 tips for taking good photographs at the zoo.
1. Plan your day –
As soon as you get to the zoo, grab yourself a map and plan out what animals you want to see and at what times. We have found the best times to see animals is just before feeding time, when they are most active.
2. Treat animals as moving subjects –
With a lot of animals constantly on the move at feeding time, I like to keep my camera settings on shutter priority mode with a fast shutter. My partner on the other hand, keeps his camera on Aperture Priority mode, with continuous shooting also set.
Another way to do this (for entry level DSLR’s) is to set it on sports mode. This will enable you to capture a burst of shots, one after another, never missing an opportunity.
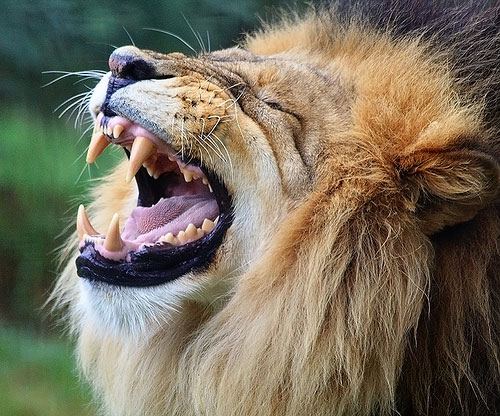
Lion photographed with a Canon 400D, hand held.
Camera Settings
Exposure: 0.003 sec (1/320)
Aperture: f/6.3
Focal Length: 300 mm
ISO Speed: 800
3. Eliminate cages –
There is nothing more annoying to a zoo photographer than not being able to photograph through the cage and capture only the animal. The best way to do this, is to zoom your lens to a longer focal length and place the focal spot on the animal itself. This should in most cases, eliminate the cage.
A trick my partner uses, is to set your DSLR camera to P mode, zoom your lens out to a longer focal length and take your shot. This tip also tends to ensure the focus is on the animal and not the cage. If all else fails, move your physical position and try again.
4. Eliminate glass –
You eliminate glass using the same method as eliminating cages, as explained above. However, there are a few other tips for glass including: wiping the glass with a cloth to get rid of grubby marks, or positioning yourself so there are no scratches between you and the animal.
5. Get in close, then crop the images even closer –
When you arrive at the zoo, take time to look through the shop and take notice of the posters and postcards being sold. You’ll soon learn that tightly cropped faces and body parts have more impact than those with ample surroundings. This allows you to capture details otherwise not seen.
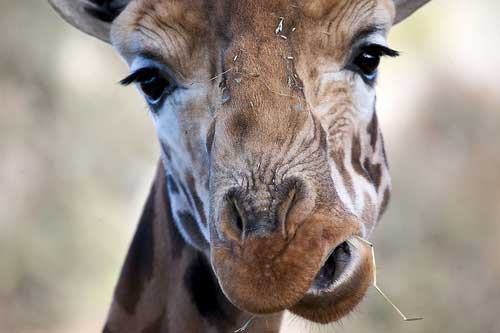
Giraffe photographed at the National Zoo in Canberra, Australia.
Camera Settings
Exposure: 0.004 sec (1/250)
Aperture: f/7.1
Focal Length: 400 mm
ISO Speed: 400
6. Focus on the eyes –
As with all living subjects, if the eyes aren’t sharp, you lose the connection between the subject and the viewer. So too with animals. Shoot for the eyes on all of your zoo photography outings.
7. Get down (or up) to the animals level where possible –
Even if it means being on your knees or laying in the dirt. Other times, you might need to stand on a seat. You’ll find your images have a lot more impact if you are at eye level to the animal, within reason of course.
8. Have patience –
Give yourself ample time at each enclosure. My partner is very good at this. I can’t count the number of times I’ve walked away from an animal, to find he then takes the perfect shot of it yawning, displaying its teeth in hunger, or capturing that unique expression.
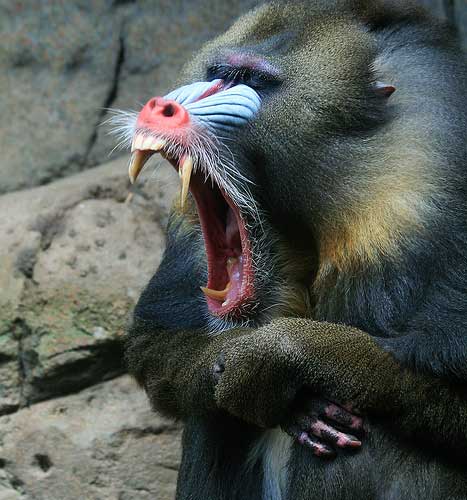
A mandrill, photographed with a Canon 400D + 70 – 300mm zoom lens.
Camera Settings
Exposure: 0.006 sec (1/160)
Aperture: f/5.6
Focal Length: 90 mm
ISO Speed: 400
9. Eliminate backgrounds where possible –
Nothing is more distracting in a zoo photo than a fence in the background, or a feeding bucket. Therefore where possible, always make the main focus on the animal. I often do this by repositioning myself so the distracting object isn’t in view, or using aperture mode (set to a small F number) to nicely smooth the background.
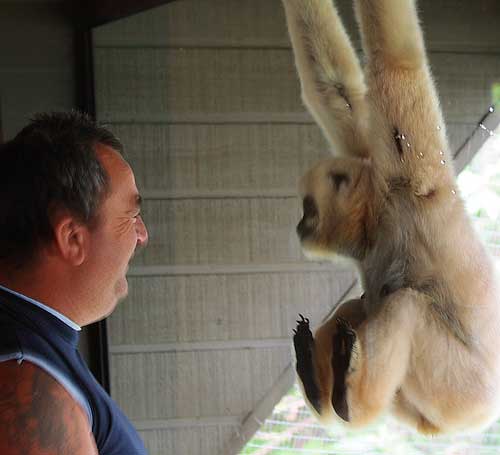
10. Photograph people and their enjoyment –
The main reason to visit the zoo should be to experience the enjoyment of viewing the different animals. Therefore, don’t forget to stand back and photograph that human enjoyment. At the end of the day when you look over your photographs, it will often be these images that bring a smile to your face.
Sign-up for our online photography course and learn how to master your digital camera in easy to understand “at your own pace” lessons.
Click here for more information and sign-up details!