Sometimes, no matter how careful you are with your DSLR setting, certain parts of a photo can look washed out and over exposed or have dark patches from shadows. This is especially true where there is a lot of white space, like a wedding dress or snow, or when taking a photo where there are deep shadows, such as a cliff face.
The Photoshop Shadows and Highlights adjustment feature can help make a photo look good and become a saver instead of going into the trash bin.
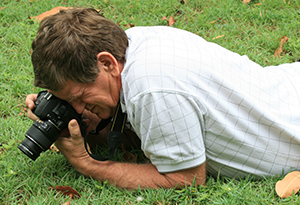
Take a look at this image below. The photographers shirt is so white it has caused an over exposed look and some of the detail is gone. We will walk through the steps that you can employ to bring the balance back to this image.
Let’s take the quick tutorial for making image adjustments with the Shadow and Highlight feature.
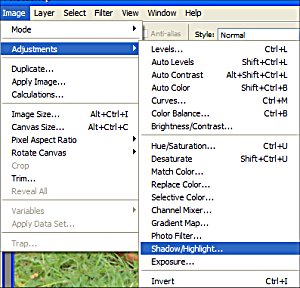
Step 1
With the image open in Photoshop:
- On top tool bar
- Click Image
- Scroll to Adjustment
- Click Shadow/Highlight…
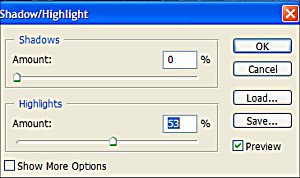
Step 2
- Depending on the condition of your photo, you will have to play with the percentage of both the Shadows and Highlights sliders.
- With our example, we slid the Shadows to 0 and moved the Highlights slider up to 53%.
- When you are happy click OK and return to the main work palette.
As you can see in the finished photograph below this tool has brought out the pattern in the white shirt. Lessened the glare and improved the overall color of the photograph.
Now with a crop and sharpen, this image is good enough to keep.

Again we reiterate that all photos will be different and you will need to play with the slider of both the Shadows and the Highlights adjuster. We suggest putting both to zero to start and go from there.
With a little practice, this photoshop tool will become one of your best friends and give new life to all your photographs.
We don’t just use this on images that look a little over exposed, we take all images into the adjustments feature and see if they can be improved. It takes very little time and the results can be amazing.