The secret to taking a fantastic photograph car light trails, is setting your digital camera on shutter priority with a slow 30 second shutter speed or more.
Set your digital SLR camera to shutter priority. This is important for all night photography. Shutter priority allows you to set a slow shutter speed so enough light is let in to the sensor. If you don’t do this, you will end up with a black image or one that only displays circles of light.
Use a 30 second shutter speed or more. The slower the speed, the more light you’ll see in your photograph.
Because your taking the photograph with a slow shutter speed, you can now afford to use the lowest ISO setting possible. Therefore set your ISO to 100 (if your digital camera goes that low) to ensure the best quality photo with no grainy pixels or noise as it’s also known.
Photograph Car Light Trails – Best Set Up.
Sit your digital camera on a tripod to minimize the effects of camera shake. The sturdier the tripod the better. If you don’t have a tripod handy, then sitting the camera on a nearby object would also work. As long as your not hand holding the camera.
Use a camera remote to take the photograph. This stops blurred images that are usually a result of camera shake. Sometimes pressing your cameras shutter button can cause a small shift in the camera when you release it. In normal circumstances this isn’t a problem. However, for night photography on slow shutter speed it can be the difference between a blurred photo or a sharp one.
Wait for a night where there is no wind. This is especially important if your tripod isn’t very sturdy. The slightest shake in your tripod can cause motion blur.
Focus Point. Photograph Car Light Trails.
Before you take the photograph, set your lens to automatic focus and focus on a far away object like the sky for example. You do this by pressing your shutter button half way down until you see a red dot flashing on the sky or far off object. Then turn off your automatic focus so it doesn’t change from there on. Your now ready to take a perfectly focussed photograph. I have heard many photographers go to the scene they are going to shoot during the day and focus their lens before returning at night. However this seems rather tedious to me.
To photograph car light trails more successfully, take more than one photograph. This is particularly important if you’re not intending to return to the same spot again.
I recently did some night photography taking 3 images of car light trails. Even though I didn’t change the camera settings between shots, one photograph turned out much sharper than the other two. This is probably due to camera shake caused by wind as the weather wasn’t the best that particular night.
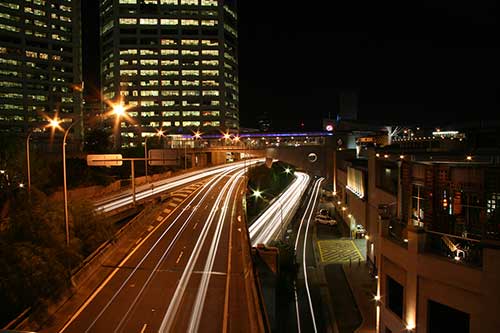
Above image – night photograph car light trails.
The camera was a Canon 400D (Rebel XTi) Digital SLR, set on shutter priority with a speed of 30 seconds.
Before taking the photograph I focussed on the night sky on the right upper corner. This set the aperture to f/22 which resulted in all the landscape being in sharp focus.
ISO speed was kept to 100 to ensure the best quality with no grainy pixels.
The lens was a Canon EF-S 17-85mm f/4-5.6 IS USM set at 17mm.
Sign-up for our online photography course and learn how to master your digital camera in easy to understand “at your own pace” lessons.
Click here for more information and sign-up details!