What is the exposure green rule and how do you go about using it?
Whenever you take a photograph in or around nature, it’s useful to expose on any part of the scene that is green, then underexpose it by two thirds. Doing this makes the colors much bolder. The greens will be deep green. All the colors in the entire scene will “pop”.
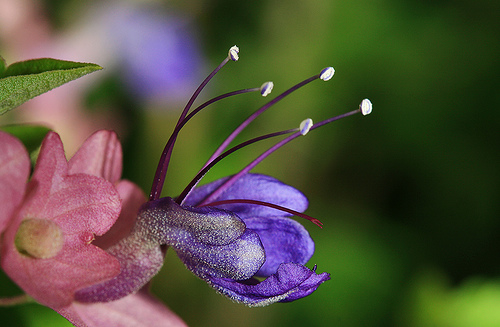
For example, for the photograph below, the exposure was taken from the green leaves to the left of the flowers. I then underexposed the shot by 2/3, refocused on the flower and took the shot. As the camera was set on manual, the shutter speed (exposure) stayed as it was when exposed on the green leaves.
Usually when you refocus on the subject you want to take a photo of, the camera will tell you the exposure is wrong. Ignore this and take the shot anyway. In most cases, it will result in a nicely exposed, detailed photograph.
If you’re not sure what I am referring to by ‘setting the exposure‘, you can find a good article on this at: Advantages of manual settings.
Note, this exposure green rule tip will also work when you have your digital SLR camera set on shutter priority. However, it won’t work for automatic modes (such as landscape, portrait) or aperture priority, as the camera then sets the shutter speed for you.
Exposing Flower Gardens
Digital SLR Camera: Canon EOS 400D / Rebel XTi
DSLR Lens: Canon EF 100mm f/2.8 Macro
Shutter Speed (exposure): 0.005 sec (1/200)
Aperture: f/11
Focal Length: 100mm
ISO Speed: 200
Exposure Program: manual
Exposure Green Rule Tip
The digital SLR camera was set on manual mode with an aperture of f/11. I focused on the green leaves that had similar light falling on them as the flowers and underexposed by two third’s. Next I focused on the purple flower and took the shot (without re-exposing).
As you can see, this resulted in beautifully colored photo with a nice balance between light and shade.
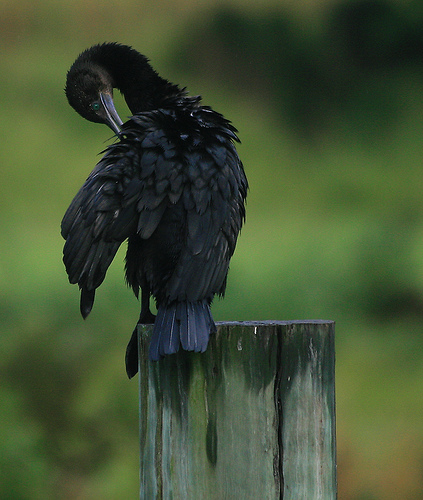
Exposure tip for black subjects like birds
Digital SLR Camera: Canon EOS 400D / Rebel XTi
DSLR Lens: Canon EF 70-300mm f/4-5.6 IS USM
Shutter Speed (exposure): 0.002 sec (1/500)
Aperture: f/5.6
Focal Length: 300mm
ISO Speed: 400
Exposure Program: manual
DSLR photography tip for exposure setting
Taking the exposure on something that is green is particularly useful in times where the subject is black. If the shot above was exposed on the black bird, the details on the feathers and the green eye would have been lost. Instead, the photographer took the exposure on the nearby grass and then underexposed it by 2/3’rds.
Another time this exposure green rule tip was useful, was during an outside photo shoot of my son.
The first shot I’d taken was exposed on my son’s face. Looking back on the LCD screen, I’d found there was a dark shadow over one side of his face. The shot was taken again, this time exposing (-2/3) on the green grass next to him. This helped to eliminate the shadow on his face.
Sign-up for our online photography course and learn how to take better photos in easy to understand “at your own pace” lessons.
Click here for more information and sign-up details!