Aquarium photography would have to be one of the hardest challenges I’ve come across. For starters lighting in these situations are usually quite dark and water is often cloudy, not to mention the thickness of the surrounding glass.
Now for the good news, digital SLR cameras have made this style of photography more enjoyable.
Improve your aquarium photography skills
1. A fast lens comes in handy. When you buy a digital SLR camera lens you will notice it has an f number on the box. The lower the f number the faster the lens. We recommend you use a lens with an aperture of f/2.8.
2. One of the main problems with this style of aquarium photography is that you need a shutter speed fast enough to prevent a blurry picture of a moving object, yet you also need to allow enough time for light to enter the camera so the results aren’t too dark.
To achieve this you will need to up your ISO setting to at least 800, possibly as far as 1600 if your camera goes that high. If needed, you can use noise reduction software to clean up the noise from the high ISO. Otherwise good panning skills are essential with slower shutter speeds.
3. Turn off your automatic flash to stop the light reflecting off the glass.
4. Anyone who has taken pictures that include glass, will tell you that reflections can be a photographers nightmare. To help eliminate glass reflections, try using a rubber lens hood and keep the front of the lens hood in direct contact with the glass.
5. Take more than one photograph of any particular subject. Shoot from different positions and distances from the tank. This will give you more than one photo to choose from. This digital aquarium photography tip is especially useful if your not intending on visiting again for obvious reasons.
Take Your Time
6. Patience is the key to taking good photographs of fish. Focus on a specific area and wait for the fish to swim into view.
7. Don’t aim your digital camera in a downward direction. For best results try to take aquarium photographs at an angle that is perpendicular to the glass and the subject. You might have to kneel down for this. Otherwise the glass can distort the cameras focus, making it hard to get a clear photograph.
Aquarium Photography Case Study 1
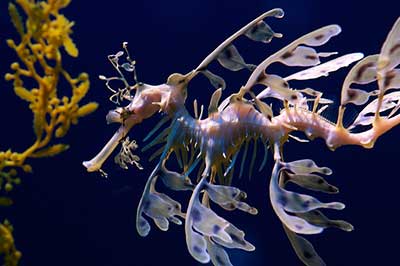
Leafy photographed by Lecates at flickr
The digital SLR camera was a Nikon D80 set on aperture priority at f/2.8. Shutter speed was 0.013 sec (1/80) with ISO 800.
A digital SLR camera was perfect for the photograph shown above. The ISO was bumped up to 800 and a fast lens was utilised with an aperture setting of f/2.8. The digital camera was manually focussed on a lit up area of the tank.
Furthermore, the camera was positioned right up on the glass to help prevent reflections. Then it was a matter of patience until leafy moved into the area the camera was focused on.
Aquarium Photography Case Study 2:
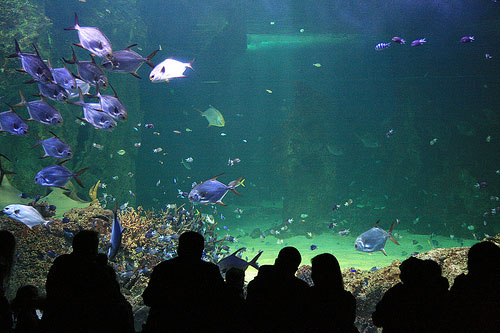
Keeping my Canon 400D (Rebel XTi) Digital SLR Camera set at a high 1600 ISO allowed me to take this photograph of a large fish tank shown below, while setting a higher aperture of f/6.3. A high aperture requires a high ISO.
This aquarium photograph could have been further improved by using noise reduction software to clean up the grainy parts that was a result of a high ISO.
8. If at first you don’t succeed in your first aquarium photography attempt, try try again. Good aquarium photographers regularly return to the same place.
Sign-up for our online photography course and learn how to take better photos in easy to understand “at your own pace” lessons.
Click here for more information and sign-up details!

