The S Curves can add or reduce contrast in the best possible way. It is like using a spotlight on a stage production, you can highlight a certain part of an image and darken another.
Using the tool is quite easy and playing with the curves on an image is the best way to fully appreciate what you can do with this great Photoshop feature.
Photographs that were shot on an overcast day or in the shade sometimes are the ones that need a boost to the contrast levels most.
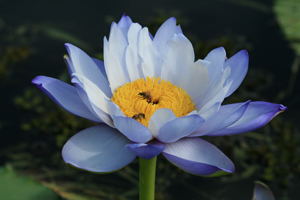
Let’s see how we can add a touch of beauty to a photograph that is not too bad in the first place. Here is the original image we will use to show what can be achieved using the S Curve feature. You can download this image so you can follow the tutorial.
Step 1
- Open your image in Photoshop
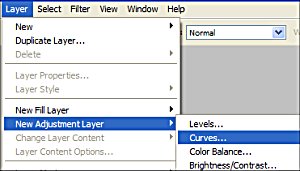
- Add a Curves Adjustment Layer (as in fig below)
- Layers > New Adjustment Layer > Curves
- Name the layer Curves 1 and click OK
Step 2
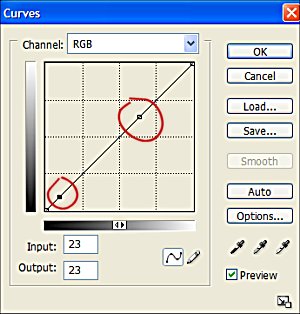
You will now have the S Curve dialogue box on the work palette. We are now at the nitty gritty part where all the fun happens. What I would like to achieve is to highlight the lotus flower and darken the background so the flower really stands out like a shining beacon of beauty.
While holding the control button down, click the cursor on an area of the image which you would like to highlight. In this case I chose to click on a flower petal at the bottom of the flower.
Notice how this has placed a point on the curve line. This is the Highlight Point.
Step 3
Now While holding the Ctrl Button down again, click somewhere on the darker background. I have chosen to click just to the left of the flower between the bottom and first petals on the left side.
Again there is a spot placed on the curve line. This is the Shadow Point.
Don’t worry if your points are a little different to mine. You will see a similar result and will get what it’s all about very quickly.
Step 4
Now Click and hold your cursor over the Highlight point, the top one, and move it slowly upwards and to the left. Keep your eye on the image and stop when you feel that it has been brightened enough. If you go too far, just pull the curve back a little.
See How it has lightened the flower against the background. Fantastic. Pull it in the opposite direction and it will darken the flower.

Step 5
Now drag the bottom Shadow point down and to the right. Notice how the background gets darker as you drag the point. Fantastic to deepen Depth of Field.
When you have finished playing around with the image and it looks good to your eye, click OK to close the Curves Dialogue Box.
Step 6
Merge your image.
Layers > Flatten All.
Save your image.
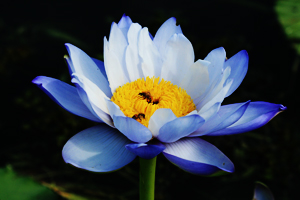
Now you can really notice how the flower stands out more and is lighter. This has been overdone slightly to give you the effect. Normally I wouldn’t lighten this as much to retain the beautiful mauve color of the Lotus flower.
Play around with the curves and you will soon develop your own style. Some images will respond to the curves feature more than others, but this tool is the best to add or reduce light on an image.