Photoshop makes it easy to get unwanted blemishes or something that annoys you out of the picture.
You will quickly find that the Spot Healing Brush Tool is one of your greatest friends when you are touching up your photographs.
Remove blotches, dust spots, those annoying power lines or telegraph wires, in fact just about any unwanted blemish can be quickly removed with this amazing feature.
This tutorial will show you how to remove spots from a photograph that is on a DSLR cameras sensor.
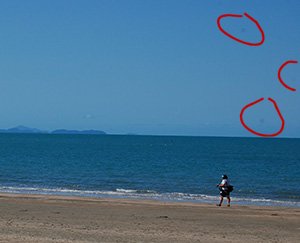
You can use the Spot Healing Brush instead of a ghastly attempt to clean the cameras sensitive image sensor. (Click the image for a larger size to see the extent of the damage.)
As you can see in fig 1, when we take a shot in a landscape aperture such as F22, the dust spots on the image sensor are visible. This makes the image quality poor and spoils the whole photo. Now let’s see how we fix that up.
 Method:
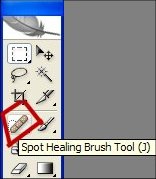
With your image open in Photoshop, choose the Spot Healing Brush from the tool palette.
Apply the settings as shown below. You can adjust the brush size to suit the photo you are working on. Make sure you have Proximity match checked.
Play around with this tool as you can heal most images and even retain intricate textures by choosing the right setting for your individual needs.
At the settings shown below, a ring will appear as you hover your cursor on the image. Place the spot over the blemish, left click and the blemish is gone. You can left click, hold and drag to remove larger blemishes.

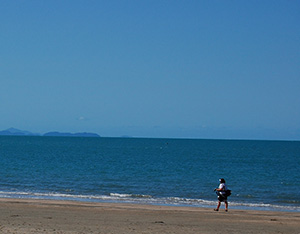
Here is the image again with blemish spots removed.
Now you don’t need to discard that photo or attempt to clean a touchy sensor with the help of this easy tutorial.