Spot metering is just one of your camera’s metering systems. To achieve perfect exposures you need to understand each of your cameras metering system and how each one is used.
By default, your cameras metering is most likely set to matrix (also referred to as pattern or evaluative on some models). For the most part, this default setting does a great job exposing for different lighting conditions. Personally I find 95% of the time I don’t need to change it. However in tricky light situations, you’ll need to know when and how to change your camera settings from matrix to spot metering.
Take this photo below for example. The pure white subject is overexposed and has absolutely no detail. It was photographed with pattern metering mode (my camera default setting). It didn’t take me long to realize I had to switch over to spot metering if I was going to capture a beautifully detailed photo of a white bird.
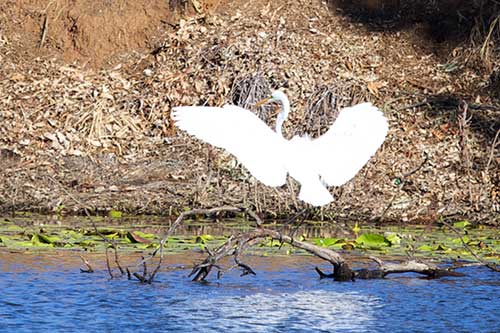
Note also I’ve cropped this image. The original photo had 85% scenery around the subject that was much darker than the white bird . The bird itself took up maybe 15% of the image. Hence my camera was exposing on the natural surroundings and not the actual bird. This is a perfect scenario for spot metering.
Spot Metering Dark Subjects
The same can happen with a dark subject, for example a black bird with very bright surroundings. A bird takes up a smaller portion of the scene compared to its surroundings. If you keep your camera set to pattern metering, you’ll find all you can see is black and no detail in the actual feathers. This is because with pattern metering the camera takes the light exposure from the scene as a whole.
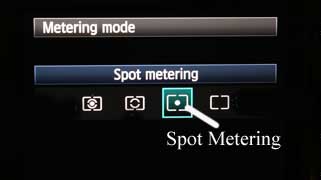
Times like these you need to switch your camera settings to spot metering (best to look in your camera manual). Spot metering on all digital cameras that I’ve seen is marked by a symbol similar to the one shown below. Some high end cameras also offer multi spot metering. This allows photographers to take the light exposure from a number of different areas of the scene.
Examples of photos taken with spot metering
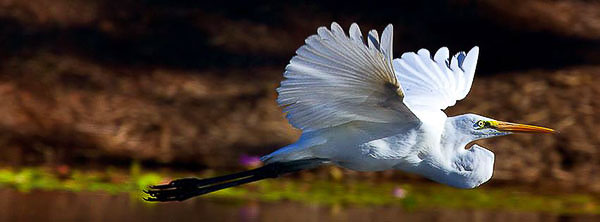
Here are some examples of bird photos taken with spot metering. Experienced bird photographers switch to spot metering for either very dark or very light colored birds. I’m not too fussed on the surroundings or the background being properly exposed, it’s the details in the birds feathers I’m wanting to capture.
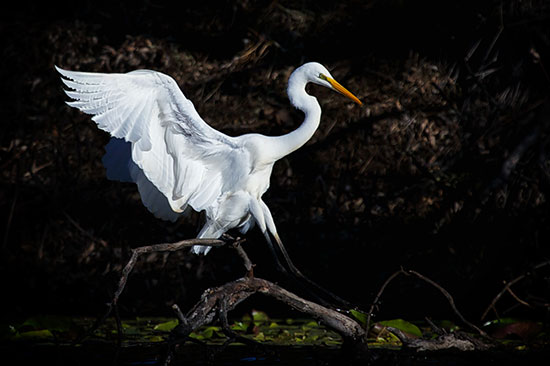
The example above was taken at Hoods Lagoon Clermont. Notice spot metering allowed me to capture a lot of detail in the birds wing. You can clearly see a bone structure and details in the feathers. It naturally set a very dark background, however it wasn’t my goal to properly expose the scenery as a whole.
This image was taken the same time as the first over exposed photo you saw at the beginning of this article. I know which one I prefer.
When to use spot metering for photographing people?
Of course your subject could very well be a person. However the same theory applies. Switch to spot metering whenever there is tricky lighting.
For example a person on a stage. Spot metering on the persons face will ensure the camera exposes the skin color correctly and not take a reading from the stage lights.
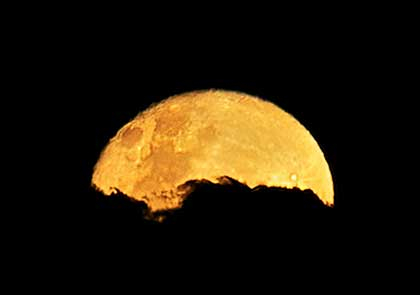
Use spot metering for photographing the moon
Spot metering is also great for moon shots where the moon will take up a very bright but small percentage of a dark scenery. This example below has been cropped tightly, so you can see the detail in the moon.
If you are wondering where the bottom half of the moon has gone, it’s behind the heavy cloud which has been silhouetted.
When to use the exposure lock button
If using spot metering and then recomposing the shot. Notice that the metering will change even if you’ve got the shutter halfway depressed. To solve this, use the exposure lock button. This is usually found on your camera body marked with a symbol that looks like *. To use it, focus on your subject, press the shutter halfway down, press the exposure lock button which will lock the exposure. You can then recompose and take the shot.
Sign-up for our online photography course and learn how to master your digital camera in easy to understand “at your own pace” lessons.
Click here for more information and sign-up details!