There are about 66 Iridium satellites orbiting the earth, which deliver a wide range of satellite communications around the globe. These satellites have become an integral part of everyday life especially for satellite phone users. Astrophotographers may or may not use the iridium companies services, but they do love to see the Iridium Flare (sometimes called glint) that occurs when the sun hits the satellites solar panels and reflects that light back down to earth.
You can easily plan your next attempt at photographing the Iridium Flare by learning when the next event will occur in your area of night sky. Simply enter your local address at the website Heavens Above. You will then see the celestial coordinates, dates and times for your area.
The Iridium Flare will usually occur early in the evening just after sundown. The “flare” or “glint” only lasts a few seconds, but armed with the time of flare, plus Azimuth and altitude coordinates, you won’t miss it.
Just prior to the flare event you will notice the satellite zooming across the sky and all of a sudden brighten immensely as the sun hits the underside solar panels. It is quite a spectacular sight. Probably more so if you are really into astronomy and astrophotography, or just an absolute geek.
While your at the Heavens Above website, find out the times and coordinates when the ISS (International Space Station) passes by your night sky. Another fantastic sky event to see and photograph. Don’t forget to give the astronauts a wave. I’m sure they will see you and wave back.
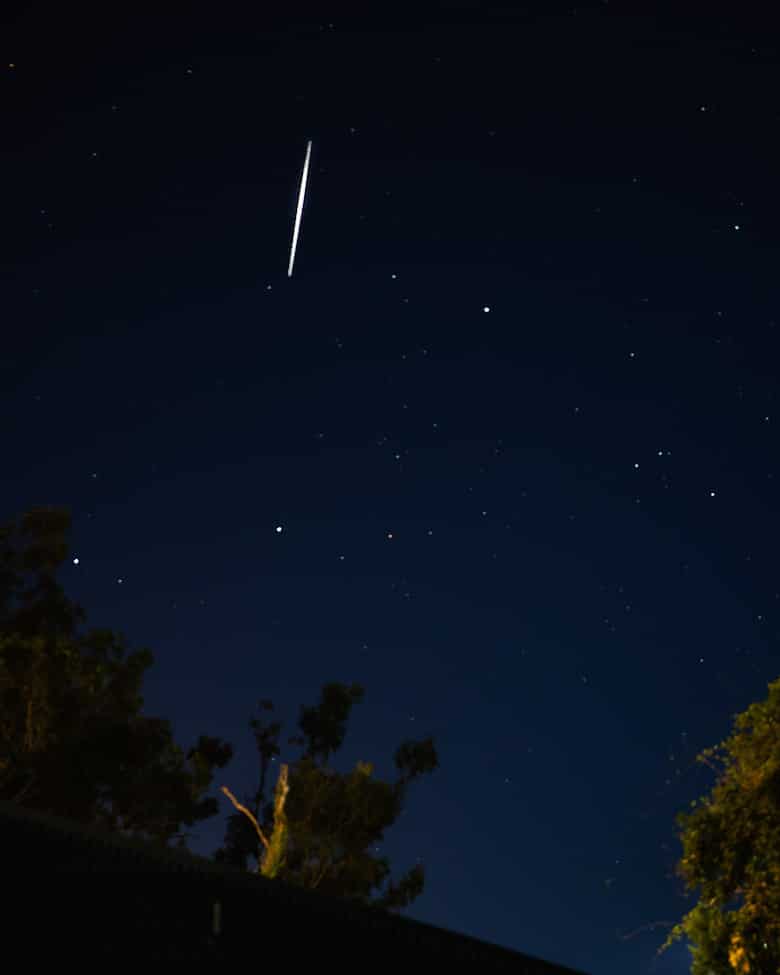
Camera Settings
For our shot of the Iridium Flare above we used the following settings:
- Camera: Canon EOS 5DSR
- Lens: Canon 24-70 mm F2.8 L USM
- Shutter Speed: 10 sec
- ISO: 640
- Aperture; F 2.8
We are going to witness the Iridium flare event for the next 4 nights in our field of view, so will be out to grab as many shots as possible. Just to see the event with your own eyes is a magical thrill. Sometimes enjoying the moment is just as good as taking photos, so never get too involved with the process that you miss the main show.
For those who we confused by talking of azimuth and altitude coordinates we will give a brief explanation of each term.
Think of azimuth as looking at the horizon. Starting at due North, which is zero degrees, if you do a complete circle you would turn 360 degrees. Therefore an azimuth of 90 degrees would be looking to the east. An azimuth of 180 degrees would be due South and 270 degrees would be West until we get to 360 or 0 again.
Altitude is height and measures the distance from the horizon to the zenith, which is directly above your head at 90 degrees. If you lay flat on the ground and look up at the sky, you will look directly at the zenith.
Now taking this knowledge, if the website www.heavensabove.com gives you the coordinates something like: Azimuth 10 degrees north. Altitude 45 degrees. You will know exactly where you should look in the sky to see the event. In this case it’s a little bit to the right of North and halfway from the horizon to the zenith high. Your field of vision is wide enough to compensate for any little mistakes in azimuth and altitude and you won’t miss the amazing sky show.
The bonus for astrophotographers to know the coordinates, is they are able to point their cameras to the particular region of the sky in advance of the event and press that shutter button at the right time.
Now all you need to photograph the Iridium Flare yourself is cloudless skies.
Sign-up for our online photography course and learn how to master your digital camera in easy to understand “at your own pace” lessons.
Click here for more information and sign-up details