Bird photography is no doubt one of the most popular genres amongst nature photographers.
I recently took a road trip where I came across a lagoon full of wildlife. Hundreds of birds were ducking and diving into the water to score themselves a feed of fish. Ah, the perfect place to spend several hours at a time photographing birds.
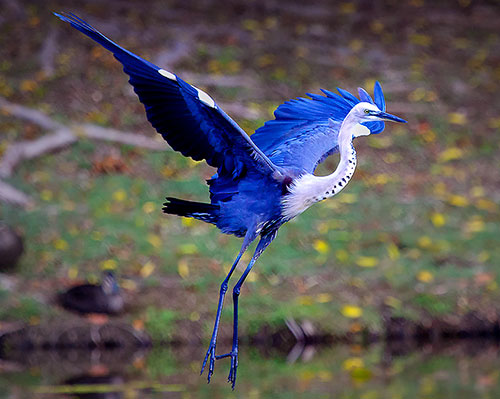
The bird image below is one of my favorites from that trip.
Camera Gear For Bird Photography
Any DLSR camera, low or high end will allow you to capture birds.
I’m a firm believer that all cameras can take great photos. It’s just the technique or skill required that will change depending on your camera model.
For example, a Canon 5D mark III or 7D model is faster than Canon EOS 550D, or EOS 1100D. With the two faster models, a photographer can capture more frames per second when using continuous shooting. With the slower models, the photographer can still use continuous shooting, however it might take a little more patience and time to get the shot they’re after.
Best Bird Photography Lens
Most useful lens for bird photography is no doubt one that is 400mm or higher. In the very least, a 200mm lens length coupled with a 2X extender would also be sufficient.
The bird image shown above was taken with a lens set at 400mm length, with the bird flying roughly 7 meters away from me in distance. The image is cropped just slightly on both sides.
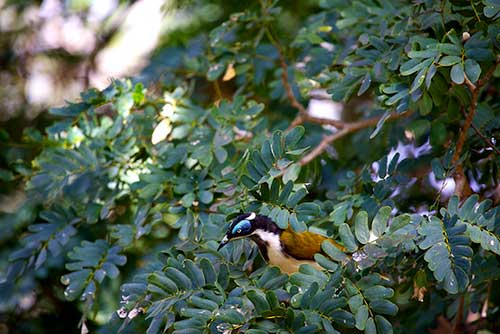
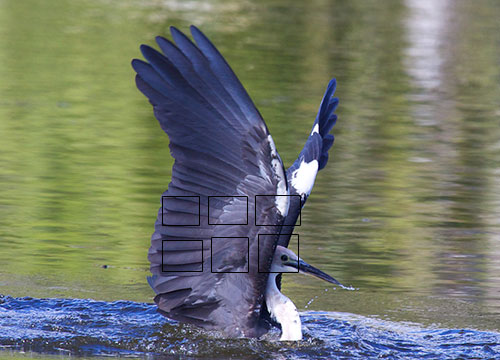
Below is another example below, again with a 400mm lens length. This time the image is un-cropped. The bird is much smaller, sitting in a tree roughly 5 meters from where I was positioned. The shot was also taken with a full frame camera. For those who don’t own full frame cameras, the bird will fill the frame a little more than seen in the image below.
Fill The Frame
Usually what I would do is crop the image so the bird fills the frame. However for this example I wanted to show you the results from a 400mm focal length. As you can see, any lens shorter than a 400mm will mean you’ll need to do quite a lot of cropping to fill the frame with the actual bird.
It’s also important to note that the price of longer lenses are on the way down. Some awesome photographs being seen from cheaper brands like the Sigma 150-500mm f/5-6.3 AF APO DG OS HSM Telephoto Zoom Lens. The price of the Sigma 150-500mm lens is only $800 USD (sourced from Amazon).
In comparison, the Canon EF 100-400mm f4.5-5.6L IS USM Telephoto Zoom Lens and the Nikon 80-400mm f/4.5-5.6D ED Autofocus VR Zoom Lens are approximately $1500 for 100mm less length than the Sigma. I recommend giving the Sigma a try, you won’t be disappointed in both quality and price. If you’re looking for examples of bird images taken with this lens, check out the Sigma Flickr Group.
Post Processing Software
The three necessities of any great bird photographer is gear, skill and software. Software is after all the modern dark room of yesteryear. I won’t go into software too much on this page as I already have a Photo Editing Software article where I list several choices for free, low cost and professional options.
Personally I also enjoy using a couple of Photoshop plugins from Nik Software called Define and Viveza. Define is useful for times when you need to increase your cameras ISO (for faster shooting), as it helps post processing grainy images. Whereas Viveza works similar to layers in Photoshop, only easier! It will allow you to selectively control light and color in your bird images.
Best Digital SLR Camera Settings For Bird Photography
There are 4 basic settings to think about when shooting with a DSLR camera. First choose your Exposure Mode, then set (or take note of) the Aperture, Shutter Speed (most important for birds) and ISO.
The secret to great bird photography (especially those in flight) is to set a low Aperture F number, coupled with the lowest ISO possible that still enables your camera to shoot at 1/1000th of a second minimum.
Exposure Modes
There are 3 popular Exposure Modes for bird photography, Aperture Priority (beginners), Shutter Priority (mid – experienced) and Manual Mode (experienced photographers).
- Aperture Priority – One of the easiest settings for beginners to start with is Aperture Priority. When using Aperture Priority the following settings are recommended. Change your ISO to 600, set a low Aperture F number (f/4.0 – f/5.6).On a sunny day, these settings should result in your camera automatically shooting with a shutter speed of 1/1000th of a second minimum. Fast enough to capture a bird in flight.
If you find your camera is shooting faster than 1/1000th of a second, then you can set a lower ISO number (for example ISO 200). This will also result in better image quality.
- Shutter Priority – Shutter Priority is my personal favorite for bird photography.When using Shutter Priority the following settings are recommended. Change your ISO to 600 (for starters), set your shutter speed to 1/1000th of a second.
After you’ve taken a few shots, have a look at what Aperture F number your camera is automatically shooting with. If it is a higher F number than say 6.3, then it’s ok to lower your ISO number for better image quality.
- Manual Mode – For those choosing Manual Mode, I’ll presume you know your camera well and repeat what I said in the introduction of this section: Set a low Aperture F number, coupled with the lowest ISO possible that still enables your camera to shoot at 1/1000th of a second minimum.
Shutter Speed
Shutter speed is your best friend when it comes to photographing birds in flight or on the move. Birds move fast! Memorable nature shots are often photographs of birds hovering or flying.
To capture a bird in motion, you will need to set a camera speed of at least 1/1000th of a second. That is usually my starting point, then I’ll view the cameras rear LCD screen and adjust to a faster speed if needed.
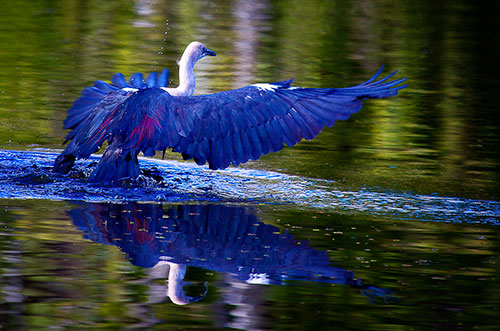
The image above of a heron landing in the water was taken with a shutter speed of 1/1000th of a second.
Aperture Settings
Personally I find the best Aperture setting for photographing birds in flight is f/5.6. I always make this my starting point. On a nice sunny day, setting your camera to Aperture Priority and shooting with f/5.6 should result in a shutter speed of 1/1000th of a second or faster.
Setting a low Aperture F number also results in a bird that stands out from the background (highly recommended).
If on the other hand you want a nature photo of a bird and its surroundings, then I recommend using a higher Aperture F number. For example f/7 or higher. Remember the higher you go, the more natural light you need to keep that shutter speed nice and fast. In other words, you need a good sunny day!
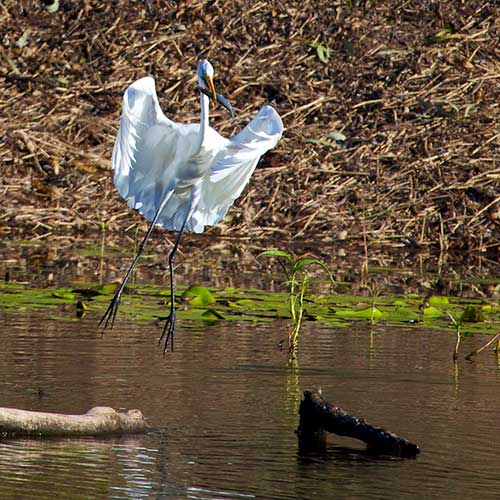
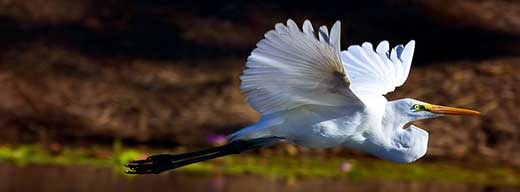
The image of a bird landing with a fish in its beak was taken with a higher Aperture F number of f/11. Hence the bird is competing with the background for attention. Later on during post processing, I wished I’d set a lower Aperture setting. A lower aperture number would have made the bird stand out on its own against a more blurred background.
ISO Settings
As for ISO, again the secret is to choose the lowest ISO F number possible that will still allow you to shoot at 1/1000th of a second. I recommend no higher than 800 if you own a low end / beginner camera model. If you own a middle – high end range camera, then you should still see good results from an ISO of 1600.
Why no higher than ISO 800 and ISO 1600? The higher you go, the more grain you will see in your images when you look at them on the computer.
Other useful camera settings for photographing birds
Drive Mode (refer to camera manual)
Always change your cameras Drive Mode to continuous. What this does is ensure your camera keeps shooting, one exposure after another, while you have your finger on the shutter button. Yes, this also means you’ll end up with hundreds of bird images. However you can always delete the bad ones later on in post processing.
Taking several shots of a bird flying past gives you a better chance of getting an awesome shot. when compared to only taking one shot at a time.
AF Mode / Autofocus Mode (refer to camera manual)
It’s recommended that you use AI Servo if you own a Canon DSLR, Continuous AF for Nikon users, or the equivalent of for other camera brands. Setting these AF Modes will ensure that the camera automatically keeps tracking and focussing on the moving bird for as long as it’s within the AF frame.
AF Point Selection / Autofocus Point Selection (refer to camera manual)
One thing I can tell you for sure, there is no time to think about composing a shot when it comes to bird photography. Therefore it’s easier to simply set your AF Point Selection to ‘center’.
AF Point Expansion (Canon) or Dynamic AF-Area Mode (Nikon)
If you own a mid to high end camera, setting AF Point Expansion (Canon DSLRs) or Dynamic AF-Area Mode (Nikon DSLRs) makes bird photography much easier. This allows the photographer to expand their Auto Focus Points and include a group of focal points. This setting is effective when it’s difficult to track a moving bird with just one AF Point.
Metering Mode
Use Evaluative metering mode if you own a Canon DSLR, or Matrix for Nikon DSLRs. Evaluative and Matrix are the default metering modes for most models and they work well with bird photography. These modes allow the camera to automatically set the set the exposure to suit the scene.
The only time I’d recommend changing it, is in extreme situations. You may be seeing detail lost when the background effects the exposure and the bird looks over or under exposed. Only in these cases, is it recommended that photographers change the mode to ‘Spot’ metering.
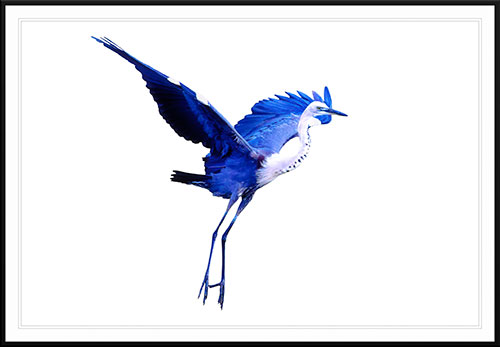
Turning Bird Photographs Into Fine Art
I’ll end this article with the photo I began with. This time I’ve removed the background so the vivid blue bird stands out on its own against a pure white background. Perfect for printing out on fine art paper and hanging on a wall.
If you have any questions on bird photography or would like to share your bird images with other photographers, you’re welcome to join us over on our Facebook Page.