The technique for how to photograph waterfalls, and that for streams, is very similar for each. One of the most popular methods is to slow down water movement so it looks smooth and milky, like the image shown below. The secret to these types of shots is to set a long exposure.
You determine how long the exposure is by setting a correct shutter speed, ISO and aperture f-number that enables the camera to shoot slowly. The slower the shutter speed, the milkier the water will look.

Mountain stream – photographed with a Canon EOS-1D X and a Canon EF 24-105mm f/4 L IS USM lens. The photo was shot early morning in a highly shaded rainforest scenery.
EXIF Data: ISO 100 | Aperture f/22 | Shutter Speed 80 seconds.
It’s important when you photograph waterfalls and streams to use a tripod and remote release when setting a long exposure. Otherwise you won’t be able to hand hold the camera steady enough to get a sharp shot. The day I photographed the image above, I did not have my tripod with me, so I sat the camera steadily on a nearby rock.
Camera Settings – Shutter Speed
If you are a beginner we recommend setting your camera to ‘Shutter Priority’ mode (either S or TV depending on your camera model). Start with a shutter speed of 1/2 second. Check the image, then adjust the speed setting depending on the result you are after and available light. The darker the scenery, the slower you can set your shutter speed for a correct exposure.
If you have a mid morning light situation, you may need to keep your shutter speed relatively fast, otherwise the water may look too overexposed. In these lighting conditions I recommend setting a shutter speed of 1/8th of a second. This speed won’t blur the water like the image seen above, however it will smooth it out enough for the viewer to grasp the idea.
ISO
Set your camera ISO to 100 when photographing long exposures. A high ISO number combined with a slow shutter speed will only result in a lower image quality. The photo will look grainy and much detail will be lost. More importantly, you want to shoot slowly. The lower your camera ISO number, the slower the shutter speed. Many models nowadays will allow photographers to set the ISO as low as 50.
Aperture
When using Shutter Priority your camera will automatically set the aperture for you, so you can skip this part and move on to our next section.
Manual Mode – Aperture Setting
If you are more advanced and understand how to shoot fully in manual, then I recommend manual in preference to Shutter Priority. This way you have full control over all three settings, Shutter Speed, ISO and Aperture.
I set the aperture depending on the light. The higher the aperture f-stop number the slower your camera will shoot. I usually start with aperture f/11, which is also my go to setting for all landscapes. If it is mid morning and there is plenty of light available, you need to slow down the shutter speed even more by setting a much higher aperture, for example f/22. I never go over f/22 as you lose sharpness the higher you go.
Metering Mode
Keep your camera metering mode on its default setting. Depending on the model. This means either matrix, pattern or evaluative. Nikon and Canon name them differently. It’s a good all round metering mode and I’ve never felt the need to change it when I photograph waterfalls and streams.
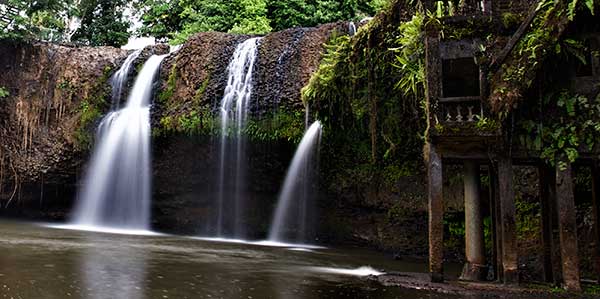
Waterfall – photographed with a Canon EOS-1D X and a Canon EF 17-40mm f/4L USM lens. The photo was shot early morning on an overcast day.
EXIF Data: ISO 100 | Aperture f/22 | Shutter Speed 5 seconds.
How to photograph waterfalls and streams in different lighting conditions
No doubt the best lighting for photographing waterfalls and streams is early morning, late evening, overcast days or landscapes that are covered in shade like a mountain forest. The darker the light, the slower the exposure, the more you can slow down water movement.
If you are shooting in any of those situations mentioned above we recommend these camera settings:
- When learning how to photograph waterfalls, we recommend beginners to use Shutter Priority. Set a speed of 1/2sec to begin with, as well as an ISO setting of 100 (50 if your camera steps down that far) After taking a few shots look in your rear LCD screen and judge whether the water is as smooth and silky as you intended. If you want to slow the water down further, set a slower shutter speed and so forth.
- For advanced photographers using manual mode set your ISO to 100 (50 if possible) and your Aperture to f/11 which is considered a good landscape f-stop. If the water isn’t looking slow enough, set a higher aperture f-number and so forth until you see the effect you are after.
If there is plenty of available light you may as well accept the fact now that you cannot slow down water nicely in broad sunlight. You may be able to slow it down a fraction, but not fully.
In these cases I recommend manual mode with an aperture of f/22 and ISO 50-100. With those settings, hopefully your camera will allow you an exposure of at least 1/8th of a second.
Photograph Waterfalls with Filters
Another option is to use a ND filter. A neutral density filter is basically a dark piece of glass put over the front of your lens to reduce the intensity of sunlight. A graduated neutral density filter or polarizing filter will block some of the light, allowing for slower exposures.
10 stop ND filters such as the Big Stopper made by Lee Filters is perfect for these situations.
Where to set your camera exposure
Never focus on the water when shooting waterfalls and streams. If you do this, what happens is your camera will expose for the water and not the surroundings. This usually results in washed out images that contain no detail in the water. Instead I recommend focusing on something green like the branches of a tree that is in direct line with the water.
Natural brown or sandy tones like rocks also works well to set the exposure. Although my first preference is always expose on something green. I explain my reasons for exposing on green colors in this article: Exposing for nature shots.
How to photograph waterfalls. Other helpful tips
- Choose a day that is not windy. When shooting long exposures you want to minimize the movement seen in nearby trees as it can take the viewers eye away from the main subject. Unless of course your intention is to show movement in the whole scene.
- Overcast days are perfect, but not rainy conditions. When I first started out, I once tried to photograph a river when it was flowing at its peak time, i.e on rainy days. I stood under an umbrella with my tripod and set a slow exposure. Every shot had drips seen in the image where water drops fell from the edge of the umbrella. Not good!
Sign-up for our online photography course and learn how to master your digital camera in easy to understand “at your own pace” lessons.
Click here for more information and sign-up details!