Understanding metering modes is important for every photographer if they are to take correct exposures. To improve your photography you need to know when to set your digital camera on matrix, pattern, evaluative, center weighted metering, spot and partial metering.
Metering modes can be one of the most frustrating settings for beginners to SLR photography. If you have ever taken an under or over exposed photograph using program mode (P), aperture priority (A Nikon, AV Canon) or shutter priority (S NIkon, TV Canon), chances are you’ve set the metering mode incorrectly.
Metering systems work by measuring the amount of brightness within a scenery or object, then sets the exposure accordingly. However, the camera can often get the exposure wrong if the onboard metering mode has been set incorrectly.
What metering modes are you likely to find on your digital camera
The majority of digital SLR cameras will give you a choice of at least three different metering systems. The names of the modes will differ depending on your camera model.
- Matrix metering on Nikon cameras is called either Pattern or Evaluative on other models.
- Most brands all name the second mode, Center-weighted metering or very close to it.
- Whereas Spot metering found on Nikon SLRs, basically work similar to Partial metering on Canon digital cameras. Some recent Canon models offer both spot and partial metering modes.
When to use Matrix (Pattern, Evaluative) metering modes
Matrix, Pattern and Evaluative are considered good all-round metering modes. The camera sets the exposure automatically to suit the scene, taking into consideration both dark and light areas. It’s considered good for evenly backlit subjects like portraiture and landscapes. It’s also the way to go when you’re not sure which metering mode to use. This is the reason why it’s the default setting for fully automatic camera settings.
As you can see by the image below, matrix metering works by dividing the frame into zones, taking separate readings from each one. The camera then takes a guess at what parts of the scene are important and exposes accordingly. For the most part, it does a pretty good job at picking the correct exposure.
When to use Center-weighted metering
Center-weighted metering assigns the greatest weight for exposure from the middle area of the frame. Therefore, it’s good for times when your main subject is in the middle of the frame and you want to take a quick exposure.
Center weighted metering would be effective when you have a bright background or backlit subject. For example, if you were taking a photograph of a persons face on a sunny day at the beach. You wouldn’t want the strong background light, or the white sand, to effect the exposure on their face. As long as the persons face was correctly exposed, that’s all that matters. It’s times like this, you would choose center weighted metering.
When to use Spot or Partial metering
Spot (Nikon) or Partial (Canon) metering should be used when you want to take an exposure reading on a specific area. It takes the reading from a very small area in the middle of your composition.
You would use spot or partial metering for example, if you had a slightly shaded white bird, against a darker background. You would then take the exposure from the birds feathers and the darker background wouldn’t effect the coloring. Or vice versa, you may have a dark colored bird with a lighter background. Setting partial metering will really bring out the darker patterns in the bird’s feathers.
You may also be interested in reading: When to use spot metering. We also have a more detailed article on: Partial Metering.
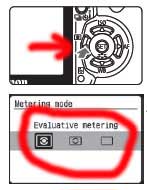
How to change your digital camera metering mode?
It’s always best refer to your camera’s manual for information on how to change the metering on your specific camera model. It’s impossible for us to cover every brand and model on the market nowadays.
Photography Assignment – Grab your DSLR camera and give this a try
Understanding how each metering mode works, is best learned through a method that I like to call ‘try and see’.
Assignment: Lesson in understanding metering modes
- Set your digital SLR camera on program mode for this assignment by turning your dial to the letter P. Just for this example, also change your ISO to 400. This will ensure you are able to take a fast photograph in many different situations.
- Go outside and take a landscape photograph in your street, firstly using the Matrix (Pattern or Evaluative on some camera’s) metering system. Then change your metering to Center-weighted and take another shot of the same landscape. Finally take a third photograph of the same scenery with Spot (partial) metering.Load all 3 images onto your computer and see what the difference is. Try this a few more times with different landscapes and sceneries.What you should find, is that the Matrix metering system works best in the majority of cases.
- Now find a friend who will let you photograph them against a bright background. For example, with the sun shining directly behind them, or against a white sandy beach or freezing snow.Compose your shot so their shoulders and head takes up 2/3’s of the frame. Once again, take three photographs, one with each of the different metering settings. Load them onto your computer and see what the difference is between each one.In this case, you should find that Center-weighted metering works best to expose the facial area correctly.
- For the next part of this assignment, place a lightly colored object against a darker background (black if possible). When you compose your shot, place the object directly in the middle of the frame. Once again, take 3 photographs, one for each metering mode. Load them onto your computer and see what the difference is.This time you should find Spot metering works best for this particular situation.

