How to use your digital SLR camera in full manual settings?
Using your DSLR camera in fully manual mode (M on the top dial), isn’t as hard as it first seems. Whether you own a Canon, Nikon, or any other SLR camera brand, using manual mode works basically the same.
Advantages of fully manual
Manual mode allows you to set both your aperture and shutter speed separately, without the camera automatically changing the other to suit. With this in mind, you can be more creative with your shots.
For example, you can photograph a beach landscape keeping the aperture high (for example f/22) so everything is in focus, yet at the same time set a slow shutter speed to create dreamy, slow motion waves.
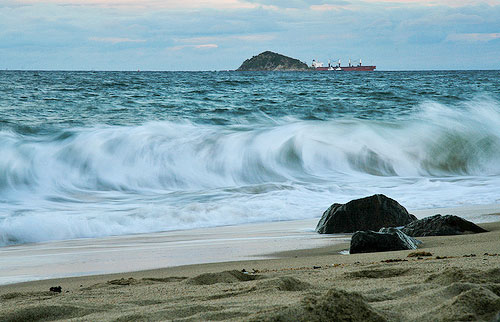
Example of photograph taken in fully manual settings
Digital SLR Camera: Canon EOS 400D / Rebel XTi
DSLR Lens: Canon EF-S17-85mm f/4-5.6 IS USM
Exposure: 0.2 sec (1/5)
Aperture: f/22
Focal Length: 85 mm
ISO Speed: 100
Exposure Program: Manual
Flash: Flash did not fire
Why this shot worked
For this beach landscape, I wanted the whole scene from the sand in the foreground, to the island and boat in the background to be fully in focus. I also intended for the ocean waves to have a slow motion dreamy look and feel to them.
For this to be achieved, the camera needed to be set on a high aperture f/22, and a relatively slow shutter speed of 1/5th of a second. If I had set the camera to aperture priority, then the shutter speed would have been automatically created for me, or conversely if I’d set shutter priority, the camera would have automatically set the aperture to suit. Therefore, setting the camera on manual mode, allowed me to fully choose both the aperture and the shutter speed.
Manual mode gives you full control over your exposure. If you are finding a lot of your photographs are either underexposed (too dark) or overexposed (too light) then working in fully manual mode will help you to better understand and correct these exposure problems. Personally, I’ve found tweaking exposure results in photographs that are much more colorful than those taken in other modes.
How to use manual mode on a digital SLR camera?
- Firstly set your camera’s top dial to the M mode and turn it on.Example of manual mode:

- To set the shutter speed, turn the rotating dial that looks like this:

- To set the aperture (f/number), press and hold down the exposure compensation button while turning the rotating dial.The exposure compensation button on your digital SLR camera looks like this:

- To set the exposure, look through your viewfinder and press the shutter button half way down to focus on an object or scenery. You will then notice at the bottom of the screen what is referred to as a light meter, that looks similar to this:
 For this example, turn the rotating dial again until this exposure line shows 0 exposure. That is, it is neither on the right or left side, but rather set in the middle.
 - If you don’t like looking through the viewfinder, you should also be able to see this exposure line on the back LCD display. Take the shot and you’ll find a well balanced exposure.

Other tips and hints for using your digital SLR camera in manual mode
- You will notice when you change the exposure level as demonstrated in the last tip, the shutter speed also changed to suit that particular exposure. You can however set the camera so it’s the aperture that changes to suit the required exposure instead. To do this, press the exposure compensation button down while turning the rotator to the correct exposure. This way it will be the aperture that is changed and not the shutter speed.
- Therefore, before setting the correct exposure, it’s important that you ask yourself which setting is more important to keep for your specific shot. Is the aperture more important or the shutter speed?
- If you’re shooting a landscape, then I recommend keeping the aperture (f/number) as you had originally set it to.
- If you are photographing a moving object like a bird for example, then I recommend keeping the shutter speed setting.
Photography Assignment – Grab your DSLR camera and give this a try
One of the most important steps for taking photographs in manual (M mode), is understanding how to achieve a good exposure.
Assignment: Step by step lesson to help you fully understand manual mode exposure
- Change your camera setting to manual (M) mode and turn it on.
- Press and hold down the exposure compensation button while turning the rotating
 dial until the aperture is the lowest f number it can go. You will be able to see this on the back LCD display. For example:
 Note: The only reason I’ve instructed you to change to a low F number is to ensure the image is taken quickly, even if shot inside.
 - Look through your viewfinder and point your camera at a nearby object or person. Press the shutter button half way down to focus, then lift up again. Don’t yet take the shot.
- Still looking through your viewfinder, look for the exposure line along the bottom. Turn the rotating dial until that exposure line is set directly in the middle (on 0).
- Now take the photograph. This should result in an image that is not too underexposed and not too overexposed. If you find the camera took too long to shoot the photograph, increase your ISO to 400 or 800 and try again.
- Repeat the lesson again, this time going outside and taking an image of your street. However, for this example, firstly set the aperture to f/11. This will ensure everything is in focus.
- While your taking photographs of your street, try setting the exposure off center. You’ll notice a few notches to the right and left of middle, will result in over and under exposure (too light or too dark).
 Note: The only reason I’ve instructed you to change to a low F number is to ensure the image is taken quickly, even if shot inside.
This lesson helps demonstrate the importance of the exposure line when photographing in manual mode.