How to correctly focus your SLR on a specific object, without the camera automatically choosing a focal point for you!
One of the most important skills for a beginner to learn from the start, is how to focus properly. Using a digital SLR camera will become very frustrating if you don’t understand how to set the focus on the exact object you’re trying to photograph. Take the two images below for example.
For the first photograph, the camera focused on the leaves in the front right, while the waterfall at the back was blurred and out of focus. In this case, the photographer was intending to take a photograph of the waterfall.

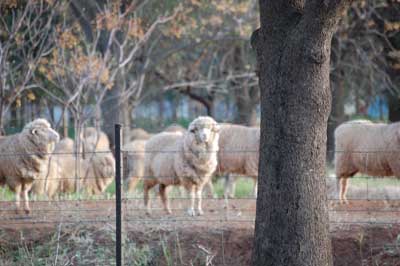
With the second image shown below, the photographer was taking an image of the sheep. However, as you can see, the camera focused on the tree to the right. You can tell this due to the tree being sharper than the sheep. If this was the initial intention, then it’s a good photo. However, if it was not, then it is a badly focused photograph.
How to focus on what you want? Or spot focus on single area.
So how do you ensure you’re focusing correctly on what you want to photograph and not the object on the front or to the side of it? In short, the answer is to set your AF-Area Mode (autofocus) to one of the main focal points on your camera. However first you need to understand what I mean by focal point.
For instance, follow this exercise below:
- Set your digital SLR camera on the P dial and turn it on.
- Look through the viewfinder as though your going to take a photograph.
- Press your shutter button half way down and look for a red blinking focal point. The object in your scene that the focal point is positioned over when it blinks red, is what your camera is focusing on. For the two examples shown above, the red focal blink would have occurred over the leaves in the front and on the tree to the right.
- It’s also important to note that different camera models will have a different number of focal points. For example, Canon 400D has 9 focal points. Whereas Nikon D40 has 3 focal points.
Depending on your current camera setup, it might be possible to keep pressing the shutter half way down and back up again, then half way down etc and it will focus differently each time. As you can imagine this could become tedious. Furthermore, a moving object isn’t going to stick around until your camera automatically focuses on the correct object. Therefore, you also need to learn how to set one particular focal point as the default main focus.
Examples below are shown for a Nikon D40 and a Canon 400D SLR camera. However, most digital camera’s work in similar ways.
How to focus using a specific focal point on a Nikon D40
- Press MENU, go to the left side (if not already highlighted) and select the up and down (next to OK button) to navigate to the pencil icon. Then highlight the CUSTOM SETTING MENU on the top of the color LCD and press OK.
- Scroll to number 3 in that menu ‘AF-Area Mode’, and choose ‘[ o ] Single Area’. Press OK to set it.
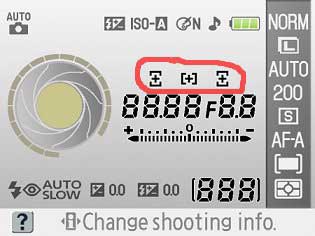
- Then set your camera on P for this example, and look in the view finder. At the bottom you will see something similar to the image below. The part I’ve circled in red is what I will be referring to in the rest of this tutorial. You’ll notice it resembles the focus points in the centre of the screen (left, middle, right).
 If you don’t want to look at it though the viewfinder then you can also see it on the back LCD screen, like the image below:

- When the middle is highlighted (part in the red circle above), any object the center focal point is positioned over when looking in your view finder, will be the main focus when the photo is taken. You are able to change this to either right, center or left by pressing the left and right buttons near your OK button.
 If you don’t want to look at it though the viewfinder then you can also see it on the back LCD screen, like the image below:
How to focus using a specific focal point on a Canon 400D
Put your camera setting on something other than automatic, for example the P setting on your top dial.
Look through your viewfinder and hold down the button circled below in red.
While holding that button down, use the rotating dial shown below to move between the numerous focal points.
Note: If you find this does not work, it may be due to you having the shutter speed or aperture screens displayed in your LCD. You might have to hop out of that particular screen first, then set your focal point before going back into the shutter speed and aperture if need be.