Your digital SLR camera’s depth of field preview button is much more useful than photographers first think. I know this from personal experience.
Like many new DSLR photographers, I pressed the depth of field preview button on my Canon 400D and saw everything got darker when looking through my viewfinder. Not understanding what I was looking at exactly, I didn’t use it again for over 6 months. Now I never take a shot without it.
What does depth of field preview button do?
The depth of field preview button, gives you a preview of the overall depth of field you can expect to see in the final photograph before you’ve taken the actual shot.
In other words, it will show you how much of your photograph will be in sharp focus and how much will be blurred.

Why is this useful? Like many beginners, I too wasted a lot of time taking numerous images while changing the aperture settings between shots, until I found the setting that blurred my background exactly as I intended.
Now I preview the background blur (or sharpness depending on what you require) and correct the depth of field before taking the photograph.
Where to find the depth of field preview button on a digital SLR camera?
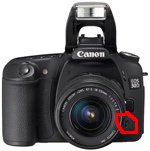
Unfortunately not all digital SLR cameras have a depth field preview button. For example, the Nikon D40 doesn’t have this option. On many other models, for example a Canon 400D, it can usually be found on the front of the camera body, on the left side, under the flash button.
It’s a very handy place for it, as it’s positioned exactly where your left hand rests when holding your camera. If you don’t see it there, check with your camera manual.
How to use the depth of field preview button?
When using the preview button, it’s important to take more notice of the out of focus area’s of the composition. It’s these out of focus area’s that you’ll see change as you set different aperture F numbers.
To do this, you have to practice looking past the change in darkness that occurs when you press the button. The higher you set the aperture F number, the more that will seem in focus. Follow the step by step assignment posted below to truly understand how it works.
Photography Assignment – Grab your DSLR camera and give this a try
Assignment: A lesson in using your camera’s depth of field preview button.
For this example, set your digital SLR camera to aperture priority AV (for Canon) or A (for Nikon), choosing the lowest aperture F number possible. Set the lens focal length to around 70mm. Now look through your viewfinder and focus on a nearby object.
When you press the preview button, you’ll most likely notice nothing much happens. This is normal for low aperture F numbers, because basically what you see when you first look through your viewfinder, is the main object in focus.
Now change the aperture F number to F/11 and try again. This time you will notice two things when you press the DOF (depth of field) preview button.
- The first noticeable difference is that the screen got darker when looking through your viewfinder. This is normal, it happens because the lens stopped down to the aperture you selected. However, don’t worry about this, your photograph won’t be that dark when you take the shot.
- Now it’s important to take notice of the changes that happened in the out of focus background, when looking through the viewfinder. Looking past the darkness, you should see that at F/11 the background elements got sharper (more focused). Now try a higher F number, for example F22. You’ll notice the higher the F number, the more that looks focused when pressing the depth of field preview button.