One of the main advantages of using a digital SLR camera, is that you can focus on a subject directly through a sheet of glass. This is exactly what I did to capture the macro image of a water droplet as shown below.
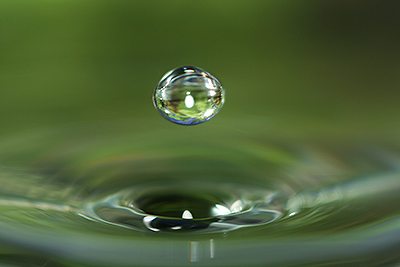
Macro Water Drop
Digital SLR Camera: Canon EOS 400D / Rebel XTi
DSLR Lens: Canon EF 100/2.8 Macro USM lens
Exposure: 0.005 sec (1/200)
Aperture: f/0
Focal Length: 100 mm
ISO Speed: 100
Other information
The aperture for this photograph displays as f/0 due to the use of an extension tube. An extension tube allowed me to close in even further to fully fill the frame with the water droplet. Placing an extension tube between the camera’s body and its lens, also meant I had to shoot completely in manual mode.
First lets start with the home studio set up
For starters, a water drop needs to fall into something that is clear enough for you to be able to focus directly through. As you can see by my setup below, a fish tank was perfect for this. Next, I knew to have the best chance of capturing the drop, it had to roughly fall into the same area with each splash. Hence, I placed a bag with a small pin hole over the top of the tank. If your following along with this home studio setup, it’s also important that you have good lighting and a nice cardboard background placed behind the tank for color.
The image below shows you how to set up a macro studio for capturing water splashes and drops.
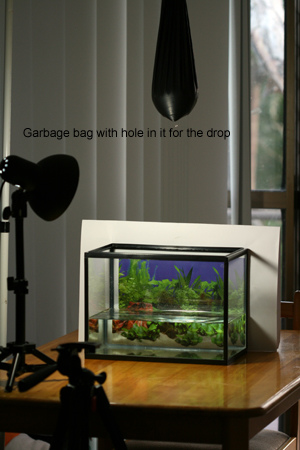
As you can see in the image above, I did try to use a tripod at first. However I found this too limiting and decided later on to hand hold the camera instead.
Where exactly do you need to focus the DSLR lens?
When photographing water, it’s best to set your digital SLR camera to either shutter priority or manual mode (if using an extension tube). You also need to turn off your lens AF (automatic focus). Instead, prefocus through the glass and onto the tip of a pencil, held approximately 1cm above the water in the same area you anticipate the droplet to fall.
When you look through the view finder you should see a red focal point, flashing somewhere around the pencil tip. As this happens, take notice of the position you’re standing from the subject. This is how you’ll need to be when taking the photographs. Don’t turn your camera off or change the lens focal length at this stage, or your settings will be lost. Now you’re ready to pierce a small hole in that bag and start taking photographs.
Other useful tips
- Make sure you use a real macro lens for best results.
- You literally need to take hundreds of photographs to get a couple you will like.
- Practice makes perfect. Macro water photography takes a lot of patience.
- Try different colored backgrounds. For example, the image below was photographed with a red piece of cardboard placed behind the tank. No photoshop editing has been used other than to resize for display purposes. Hence, the red color is shown exactly how the photo was saved directly from the camera.

Colored Water DropsDigital DSLR Camera: Canon EOS 400D / Rebel XTi
DSLR Lens: Canon EF 100/2.8 Macro USM lens
Exposure: 0.005 sec (1/200)
Aperture: f/2.8
Focal Length: 100 mm
ISO Speed: 100
Exposure Program: Shutter priority
Other information
This time an extension tube was not used to take this photograph thereby eliminating the need for fully manual camera settings. Note, I still had to turn off AF (automatic focus) on the actual lens. Not all macro lens have this option so don’t worry too much if you can’t find AF on your lens.
The digital SLR camera was set to shutter priority with a speed of 0.005 sec (1/200). This enabled me to shoot fast enough to capture a moving droplet. To do this with such a small aperture I used my cameras onboard flash. This ensured the photograph didn’t turn out completely black.